Face Proportions for Beginners: A Complete Guide to Placing the Features
Ever tried to draw a face, only to watch the eyes creep too high, the nose and mouth bunch together, and the whole thing end up “off in a way you can’t name”?
The problem is almost never a “shaky hand” — it’s that the features aren’t in the right places. Whether a face looks right depends first on where you put things, not how neatly you draw them. And “the right place” follows real rules. That’s what this guide teaches: face proportions.
This is written for someone with zero drawing experience. No skull anatomy, no jargon — just the most practical way to see a face: the three thirds, the five-eye rule, and how the features align. Read it, draw along once, and you’ll be able to block in a front-view head with every feature in the correct spot.
One thing up front: every ratio below describes an idealized average face. It’s a ruler to help you start, not an absolute standard for every person. Real faces vary — some have a long middle third, some have wide-set eyes. Learn the standard first, then learn to spot the differences. That’s the right order. Section 7 covers individual variation in detail.
In this guide
- 1. The Three Thirds: split the face vertically
- 2. The Five-Eye Rule: split the face horizontally
- 3. How the features align (the most important section)
- 4. Each feature: position and proportion
- 5. Different angles: front, 3/4, profile
- 6. The 8-step drawing workflow (just follow along)
- 7. Individual variation: proportions are a start, not the answer
- 8. Practice plan and self-check tools
- FAQ
All you need: a pencil, a sheet of paper, and an eraser. A ruler is optional (handy early on to check your eyeballing, but rely on your eye for the real drawing).
1. The Three Thirds: split the face vertically
Bottom line: from the hairline to the chin, the brow line and the nose base line divide the face into three roughly equal sections. These are the “three thirds.”
| Section | Spans | Share |
|---|---|---|
| Upper third | Hairline → brow line | about 1/3 |
| Middle third | Brow line → nose base line | about 1/3 |
| Lower third | Nose base line → chin | about 1/3 |
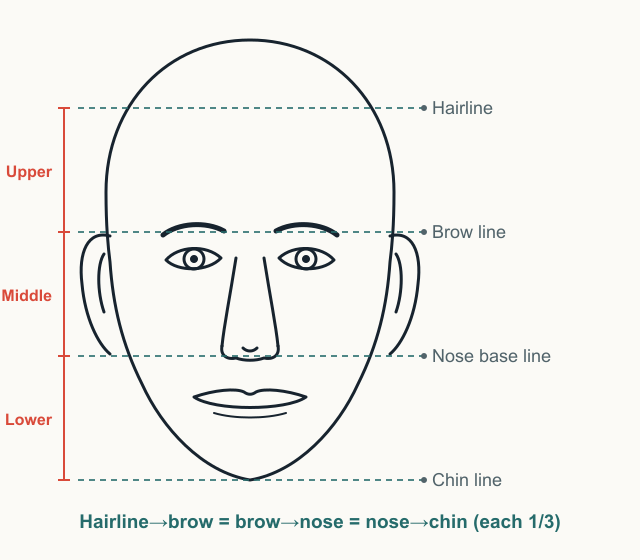
Why it helps: the most common beginner mistakes are putting the nose and mouth too low, or making the forehead too short. The three thirds give you three horizontal “foundation lines.” As long as those three sections are roughly equal, the vertical structure of the face won’t fall apart.
Mnemonic: “Hairline to chin, two cuts at brow and nose — three parts the same.”
How to use it:
- Lightly mark the two endpoints: the hairline and the chin.
- Divide that distance into three equal parts (by eye, or with a ruler).
- The upper divider is the brow line; the lower divider is the nose base line.
- From now on, every feature “hangs” on these lines instead of being dotted in by feel.
Note: the three thirds measure hairline to chin, not top-of-head to chin. There’s still a stretch of skull above the hairline — don’t count it in the thirds.
2. The Five-Eye Rule: split the face horizontally
Bottom line: at eye level, the width of the face is about five eye-widths. This is the “five-eye rule.”
From left to right:
| Slot | Spans | Width |
|---|---|---|
| ① | Left face edge → outer corner of left eye | 1 eye-width |
| ② | Left eye (outer corner → inner corner) | 1 eye-width |
| ③ | Between the eyes (left inner corner → right inner corner) | 1 eye-width |
| ④ | Right eye (inner corner → outer corner) | 1 eye-width |
| ⑤ | Outer corner of right eye → right face edge | 1 eye-width |
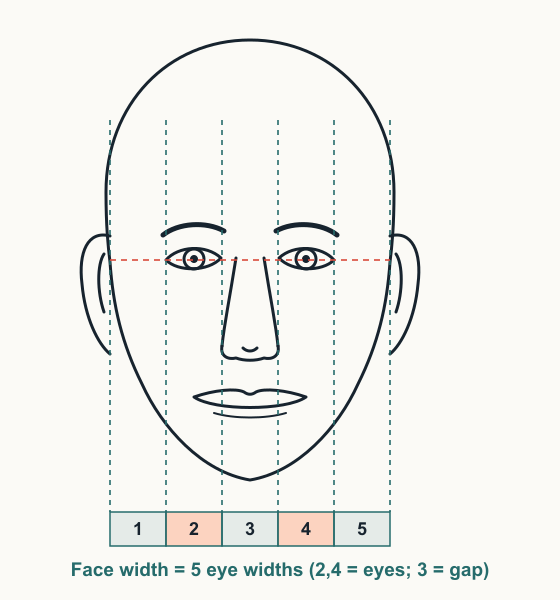
Why “five eyes”: because each eye takes one slot, and the gap between the two eyes is also about one eye-width — add one slot of cheek on each side and you get exactly five. Remember “the eye gap = one eye-width” and you’ll never forget the rule.
Mnemonic: “Five eyes wide, one eye between.”
How to use it:
- Draw one eye first and measure its width as your “unit.”
- Leave that same unit of space between the two eyes.
- Leave one more unit from the outer edge of each eye to the face edge.
- This keeps the eyes from being too big, too crowded, or too far apart.
The five-eye rule only holds in a front view at eye level. Turn the head and the horizontal width compresses, so the rule no longer applies (see Section 5).
3. How the features align (the most important section)
The three thirds and five eyes give you a “grid.” Alignment tells you exactly which line each feature snaps to. This is the core of drawing a face accurately. The master diagram below draws every key alignment line at once — worth studying repeatedly.
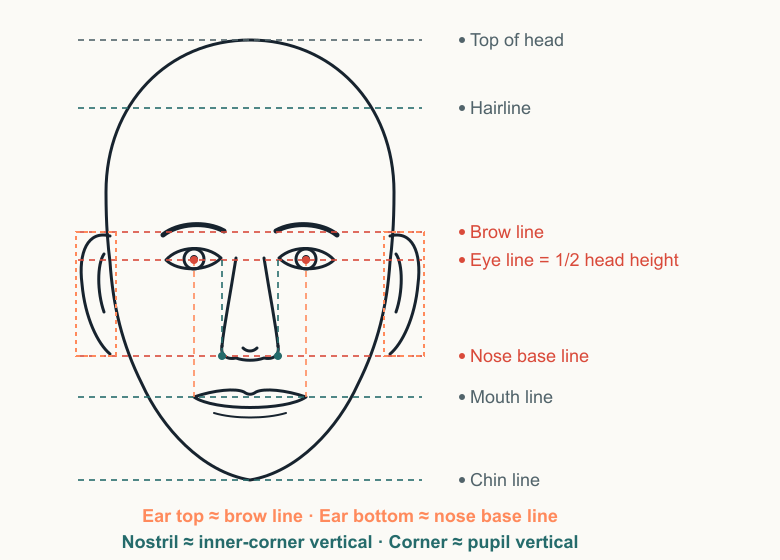
Memorize these six relationships:
1. Brow line ≈ top of the ear The highest point of the ear sits on roughly the same horizontal line as the brows.
2. Nose base line ≈ bottom of the ear The lowest point of the ear (the earlobe) sits on roughly the same horizontal line as the base of the nose. → Together: the whole ear spans exactly the “middle third” (brow to nose base). This is the fastest way to place the ears.
3. Eye line ≈ 1/2 of top-of-head to chin Fold the head in half from crown to chin; the crease is the horizontal line the eyes sit on. → Beginners often draw the eyes too high (up on the forehead). Remember “the eyes are at the exact middle of the whole head” and you’ll fix it instantly.
4. Nostrils ≈ verticals from the inner eye corners Drop a vertical line down from each inner eye corner; the outer edges of the nostrils land roughly on those two lines. → In other words, nostril width ≈ the eye gap ≈ one eye-width. The nose won’t come out too wide or too narrow.
5. Mouth corners ≈ verticals from the pupils With the eyes looking straight ahead, drop a vertical line down from each pupil; the corners of the mouth land roughly on those two lines. → In other words, mouth width ≈ the pupil distance ≈ two eye-widths.
6. The vertical ratio of nose base, mouth, and chin Divide the “lower third” (nose base → chin) into three again: the mouth line (where the lips meet) sits at the upper 1/3, leaving the remaining 2/3 for the lower lip and chin. → That is, “nose base to mouth line : mouth line to chin ≈ 1 : 2.” The mouth won’t come out too low.
Mnemonic chain: “Ears bracket the middle third; eyes sit at half the head; nostrils meet the inner corners, mouth corners meet the pupils; the mouth is one-third down the lower third.”
How to use it: when blocking in, first draw a guide grid of horizontal + vertical lines (like the master diagram), “pin” each feature’s endpoints to the intersections, then connect them into shapes. Get the positions right and the face already “reads” as a face — even if the shapes are simple.
4. Each feature: position and proportion
Here’s each feature on its own, with “position + proportion + how to apply it.”
Eyes
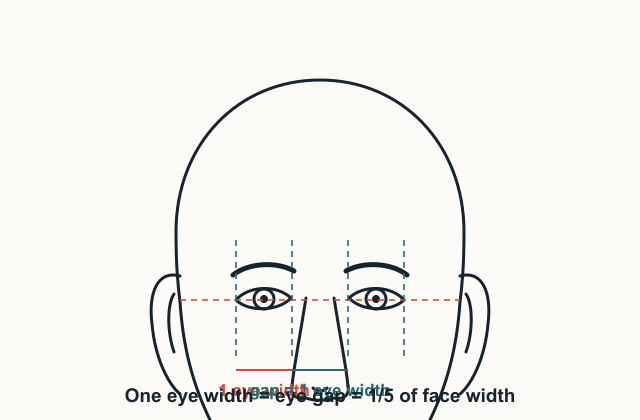
- Position: eye line = 1/2 of top-of-head → chin.
- Width: one eye = 1/5 of the face width; the eye gap = one eye-width.
- Corners: the inner corner aligns with the nostril vertical; the outer corner sits slightly higher than the inner (looks more alert).
- Apply it: set the eye line first, use the five-eye rule for the left/right boundaries, then draw the almond shape.
Eyebrows
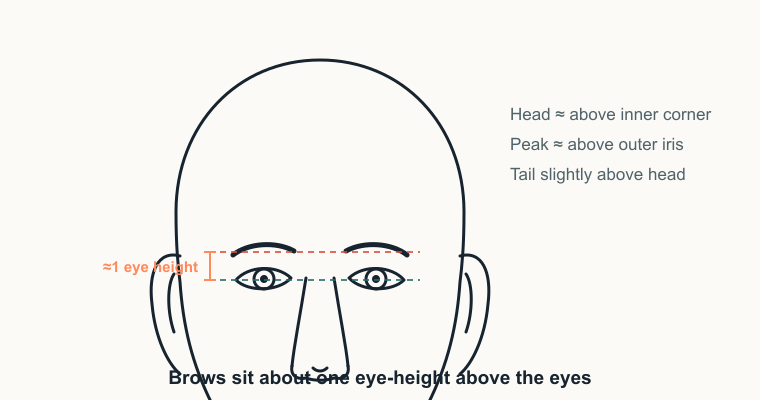
- Position: brow line = the boundary between the upper and middle third; about one eye-height above the eyes.
- Length and arch: the head of the brow ≈ directly above the inner corner; the peak ≈ above the outer edge of the iris; the tail sits slightly higher than the head and drops away naturally.
- Apply it: brows drive expression. Set the height on the brow line first, then draw the arch — don’t draw them hugging the eyes.
Nose
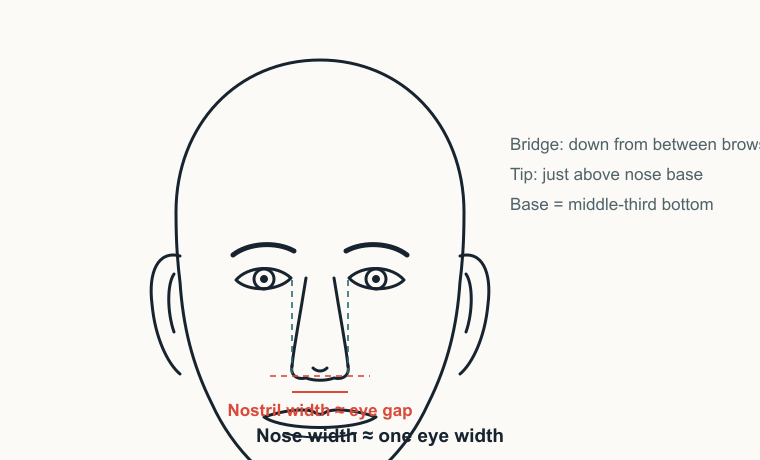
- Position: nose base = the bottom of the middle third (the nose base line).
- Width: nostril width ≈ eye gap ≈ one eye-width, aligned with the inner-corner verticals.
- Structure: the bridge runs down from between the brows; the tip sits just above the nose base; the nostrils are on either side.
- Apply it: don’t make a front-view nose too wide. Dot the two nostril points first (on the inner-corner verticals), then connect the bridge.
Mouth
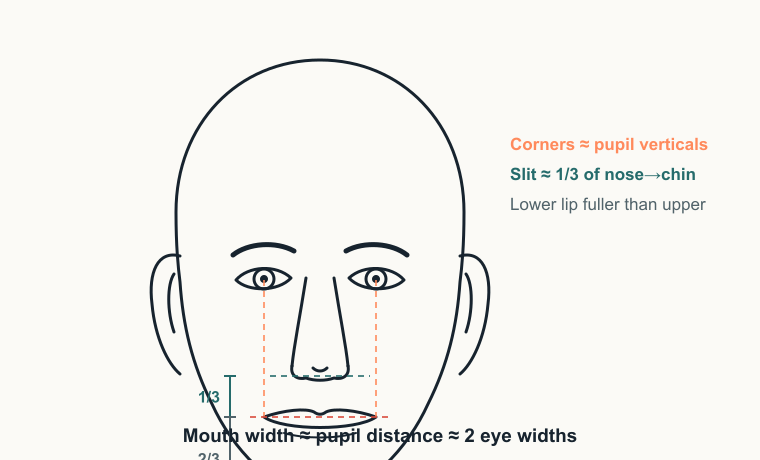
- Position: mouth line = 1/3 of the way from nose base → chin.
- Width: mouth width ≈ pupil distance ≈ two eye-widths; the corners align with the pupil verticals.
- Fullness: the lower lip is usually a bit fuller than the upper (about 1 : 1.5).
- Apply it: dot the two corners (on the pupil verticals) and the mouth-line height first, then draw the lip shape — this avoids a mouth that’s cavernous or pinched.
Ears
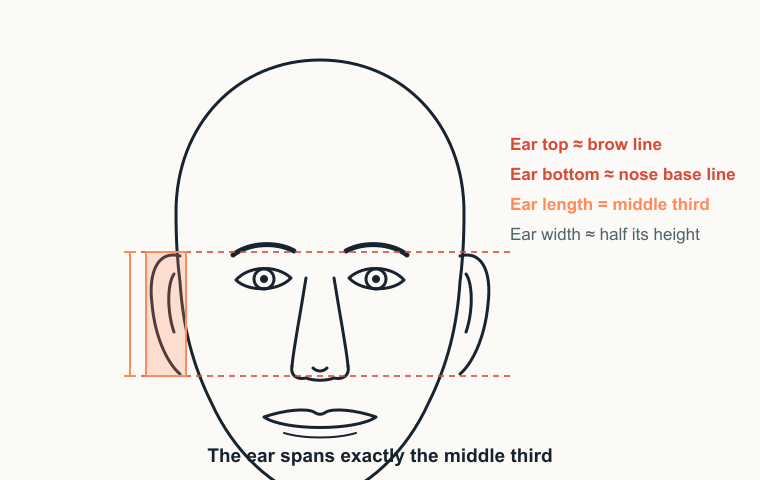
- Position: top ≈ brow line, bottom ≈ nose base line.
- Proportion: ear length ≈ the middle third; ear width ≈ half its length.
- Apply it: don’t fuss over the inner ear. Block a vertical rectangle from “brow to nose base” first, then draw the ear outline inside it — the position won’t drift.
5. Different angles: front, 3/4, profile
Bottom line: turn the head and the vertical heights barely change, but the horizontal widths get redistributed. The three thirds (vertical) still work; the five-eye rule (horizontal) only holds in the front view.
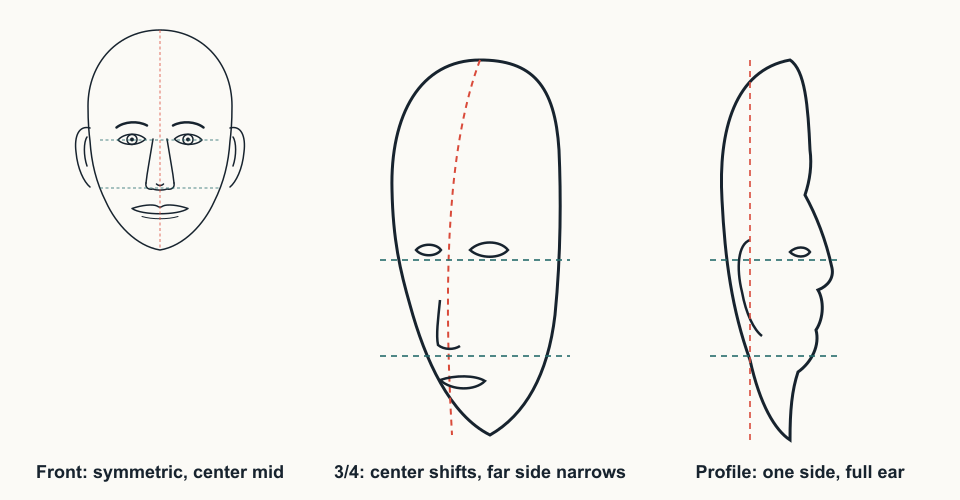
| Angle | Center axis | Horizontal width | Ears |
|---|---|---|---|
| Front | Straight, centered, symmetric | Full five eyes | A sliver of each side |
| 3/4 | Becomes a curve, leaning toward the turn | The turned-away side narrows; the far eye narrows | Near ear hidden, far ear more visible |
| Profile | Moves to the side of the head (in front of the ear) | Only one side left; five-eye rule fails | One ear fully visible |
Why it changes: a face is a 3D curved surface. Turning the head is like projecting that curved surface onto the paper at an angle — the part facing you opens up, the part turning away gets compressed, so horizontal distances look shorter. But at eye level the vertical heights aren’t affected, so the eye line, nose base line, and other horizontals stay at the same height in every angle — that’s your anchor for placing features across views.
How to use it:
- For a 3/4 view, draw a curved center axis first to set the direction, then narrow the far-side features and pull them toward the axis.
- For a profile, drop the five-eye rule and place things using “the ear + the nose-base/eye horizontals,” focusing on how far the nose, lips, and chin project forward.
6. The 8-step drawing workflow (just follow along)
This workflow turns everything above into concrete actions. The diagram shows the finished state of each step.
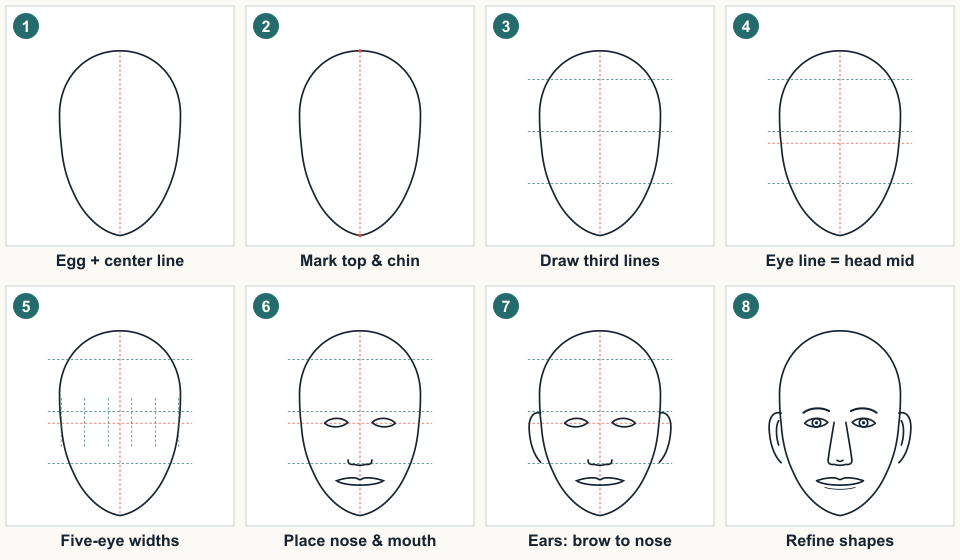
- Draw the egg + center axis. An egg shape, wider at the top and narrower at the bottom, stands in for the head; a vertical line down the middle keeps it symmetric.
- Mark the top and the chin. Dot the top and bottom of the egg — this is the master ruler for every vertical proportion.
- Draw the third lines. Estimate the hairline, divide hairline → chin into three, and draw the brow line and nose base line.
- Set the eye line. Fold top-of-head → chin in half, mark the midpoint, and draw a horizontal line — the eyes live on it.
- Use five eyes for the eye width. With one eye-width as the unit, lay out five slots along the eye line to fix both eyes and the face width.
- Place the nose and mouth. Nostril points go on the inner-corner verticals and the nose base line; mouth corners go on the pupil verticals at the mouth-line height (1/3 of the lower third).
- Use brow and nose base for the ears. The ear top meets the brow line and the bottom meets the nose base line; draw a vertical rectangle on each side, then refine.
- Refine the outline and details. With every position correct, now refine the feature shapes and face shape, then erase the guide lines to a faint ghost.
The core mindset: place first, draw shapes second. Steps 1–7 are all about dotting positions and drawing guides; only step 8 actually renders detail. Reversing the order (diving straight into the eyes) is the root cause of beginner faces going crooked.
7. Individual variation: proportions are a start, not the answer
Bottom line: the three thirds and five eyes describe an “average face”; real people vary around it. Once you know the standard, actively look for how your subject deviates.
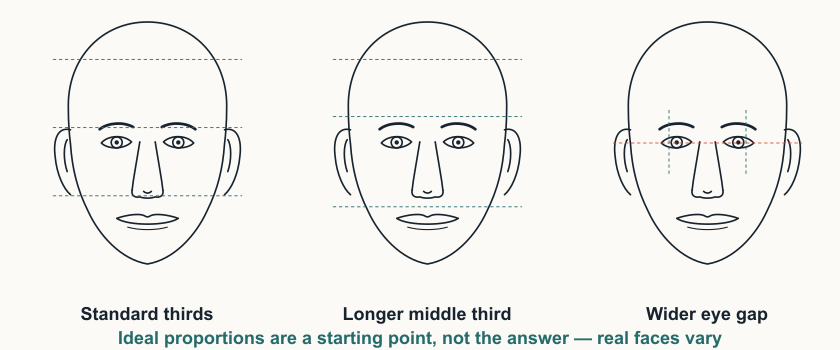
Common variations:
| Trait | Direction of deviation | What to look for |
|---|---|---|
| Longer middle third | Nose looks long, more mature | Brow → nose base > the other two thirds |
| Wide-set eyes | Eye gap > one eye-width | Inner-corner verticals fall inside the nostrils |
| Shorter lower third | Looks younger, baby-faced | Nose base → chin < 1/3 |
| Lower eye position | Large crown, small face | Eye line below 1/2 of head height |
A special note on children: kids have a large crown and a small face, so the eye line sits well below 1/2 of the head height, and the lower third is shorter too. Applying adult ratios directly turns a child into a “little adult.”
How to use it: still start from the standard proportions (so nothing collapses), then compare against your model/photo and “edit in” the deviations. The standard is the foundation; the differences are what make it “look like this person.”
8. Practice plan and self-check tools
Practice path (easy to hard):
- Draw only the guide grid (three thirds + five eyes + alignment lines), no features — train your “sense of placement.”
- On the grid, dot the feature endpoints and connect them into simple shapes; finish three front-view heads.
- Find a front-view photo, estimate the proportions by eye before drawing, then overlay your drawing to compare the deviations.
- Try 3/4 and profile views to feel the horizontal compression.
Self-check with a tool: after drawing, open this site’s FlashFace online face maker and place the eyes, nose, mouth, and other parts where you think they belong. If the result looks balanced, your understanding of the proportions is right; if it feels off, go back to the alignment relationships in Section 3 and re-check. It has a large library of feature parts, which makes it great for quickly validating your “sense of position” — and a fun way to visualize the face in your head.
FAQ
Q: Do the three thirds and five eyes apply to everyone? No. They’re an ideal average — a ruler to start with. Real individuals vary, so learn the standard first, then observe the deviations (see Section 7).
Q: Why are my eyes always too high? Because you forgot “the eyes are at 1/2 of top-of-head → chin.” Beginners working by feel often put the eyes up on the forehead. Draw the eye line at half the head height first and it’s fixed.
Q: Do I have to use a ruler? No. A ruler only helps calibrate your eye early in practice. For real drawing, rely on your eye + guide lines; it gets accurate with reps.
Q: How do I find the thirds when bangs cover the hairline? Set the brow line and nose base line first (they’re easier to see), then work backward to the hairline using “middle third = lower third”; or estimate the crown first and adjust.
Q: Do I use these ratios for children too? The framework works, but change the numbers: a child’s eye line is below 1/2 of head height, the lower third is shorter, and the crown is larger. Don’t apply the adult equal-thirds.
Q: I’ve got the front view — what about the profile? Drop the five-eye rule for the profile, keep the horizontal lines from the thirds (the eye line and nose base line stay at the same height), place things using the ear, and focus on the front-to-back relationship of the nose, lips, and chin (see Section 5).
One last summary: draw a face by laying down lines before shapes — the three thirds fix the vertical, the five eyes fix the horizontal, and alignment pins the features. Get the positions right and you’ve already won half the battle. Now pick up your pencil and draw your first head using the 8-step workflow in Section 6.